This is a fairly simply engine to work with as the cab, fuel bunker and side saddle tanks are simply removed by gently pulling.
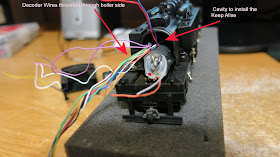
Once these are removed, assuming you are working on a recent "DCC Ready" model, you should see the white 9 pin JST connection for a "plug and play" install of the decoder. I won't be using this so I cut it off and harness, and also drastically shortened the engine harness, the less wire clutter, the better. Originally I had thought about placing the decoder inside of the rear fuel bunker, but had been curious if the saddle tank(s) could work. Upon further inspection, yes the Soundtraxx TSU 1100 Steam decoder would lay snugly withing the left tank. There is no room for two sided tape, nor really a need for it. Next I carefully measured (eyeballed) and located a good spot to drill the hole in the boiler to thread the decoder wires through. There is a larger cavity inside the boiler, above the motor to allow room for these wires and the Keep Alive capacitor.
Hole as drilled.
Soundtraxx TSU 2 where she will rest under the saddle tank.
With decoder harness threaded through boiler into the cab area.
I did however lay a piece if electrical tape on top of the wires so to better hide the brightly colored wires in the seam between the tank and boiler.
Rear view of the install thus far.
From here all to do is solder the connections for the decoder. keep alive and sugar cube speaker.


No comments:
Post a Comment